

Solar panels - first steps

We recently had solar panels installed. Naturally, I’d like to integrate them into Home Assistant so that I can use it to make the most of them. Over a couple or so articles I’ll describe what I’ve done so far to achieve that. This article concentrates on describing what we’ve had installed and how I’ve got the data into HA.
The why and what
I’ve been tempted by solar panels for a long time. Some 12 years ago my brother had them installed when the Feed In Tariff was rather more lucrative than today. Not long after, we had a company come round to give us a quote but they said given the layout of our roof, it wouldn’t be practical. So that was it for a while. However, with the huge increase in electricity prices and a desire to reduce our carbon emissions, along with a cold call, we decided to see what advances in technology might mean.
To cut a long story short, it was now more feasible - solar panels are more efficient than ever and are a little larger. One of our solar panels can generate 450W in good conditions and still generates when it’s cloudy, albeit much reduced. But probably the game changer, at least as far as I was concerned, is that modern systems come with a battery. This battery is obviously charged by the panels but, it can also be charged from the mains to a schedule of my choosing (eg at off-peak rates). So we decided to go ahead.
Our system is a Growatt system and consists of:
10 solar panels with a nominal max of 4.5kW, five facing south, five facing west (the maximum I’ve achieved so far is just under 3kW, but they were installed in early November so I don’t expect anywhere near the maximum until spring).
A Growatt hybrid inverter
A lithium ion battery with a nominal capacity of 5kWh
A ShineWiFi-X data logger (this is the device that provides the “smart” functionality via a website and phone app)
Basic operation
The installation process included configuring the ShineWiFi-X to connect to our WiFi and the creation of an account in the Growatt environment. This account is then used to access the system through the Growatt website and ShinePhone app. The system sends updates to the Growatt servers in China every five minutes so you can see what your system is doing up to five minutes ago. You can also view your production and consumption history through graphs and tables.
It’s through either the app or website that you configure your system, for example to charge the battery during off-peak periods. I use this a great deal, setting the battery to charge to 100% from 1am if the forecast for the next day is very miserable, charge to rather less than 100% if the forecast is better, and 50% if we’re away.
I have sadly become almost obsessed with monitoring what’s happening!
The ShinePhone app has one rather infuriating feature - you have to log in to it almost every time you use it, and logging in includes checking a box to accept their Ts&Cs. First world problem I know but almost by itself would motivate me to see if I can get the data into HA and so avoid the app.
Getting the data into Home Assistant
Unfortunately, Growatt does not have a public API to enable third parties to easily integrate with its systems (this is an area where governments really do need to get involved and introduce appropriate regulations). Fortunately, there are some Growatt users out there who have managed to work out how the ShineWiFi-X sends data to the Growatt servers (and work is underway to work out how instructions to configure the system are sent from the Growatt servers to the ShineWiFi-X). They have put together a solution that can be used in Home Assistant (HA) to get the data from a Growatt system.
The essence of how this works is that your HA device acts as a proxy (the Grott server, see below) - instead of the Growatt servers and the ShineWiFi-X talking directly to each other, they talk via your the Grott server in your HA device (a Raspberry Pi 4 in my case). Every message received by the Grott server, either from the ShineWiFi-X or Grott servers, is echoed on to the other so they are oblivious to its existence. For messages containing actual data (there’s a lot, not just generation, battery charge level etc), the Grott server reads them and extracts the data into HA entities.1
Home Assistant setup
There are a few steps that need to be followed carefully to set up HA correctly for your Growatt data. This is how I did it (in most cases I haven’t described the detail, there are plenty of guides you can find via Google etc):
I installed the HA Mosquito broker from the add-on store with no changes to the default configuration. Once the broker had started, the MQTT integration was automatically found by HA and I simply enabled it, again using the default configuration.
Then I installed the Grott add-on using the instructions here by using the ADD ADD-ON REPOSITORY TO button, which then gives the Grott add-on in the list of available add-ons in the store. It is important that you select the Grott Beta branch (2.8) version, not the 2.7 version.
Once installed, I had to go to the Configuration tab and change the Inverter type to SPH, as my inverter is an SPH 6000TL BL-UP (this is explained in the Documentation tab), and I also enabled the Enable grott MQTT option. Note the Home Assistant plugin is left disabled as I use the Grott integration (see the next step).
At that point I could start the add-on which gives you the Grott server.Next came installing the Grott Home Assistant Custom Component. I installed this following the instruction in the link using HACS. This provides a mechanism to have the data conveniently in HA.
At this point you have a working Grott server but no data is going to it.
Redirecting the ShineWiFi-X
I then had to redirect the ShineWiFi-X (and Growatt servers) to send their messages to the Grott server. This was straightforward:
First, I logged into my Growatt account at https://server.growatt.com/index
On the default (Dashboard page), at the bottom I clicked on the All Devices link (highlighted in the image below):

On that page, I clicked on the Datalogger Setting link (highlighted) to get to the form where I could update the (local) IP address to which the ShineWiFi-X and the Growatt servers will send their messages:


In the form, I selected the Set IP option, entered my HA’s IP address, entered the password (this is a standard form, growattyyyymmdd - yes it changes every day) and clicked on Yes

Now I had data coming into HA and updating every five minutes. Of course I wanted it to update more frequently.
Changing the update frequency
Changing the update frequency took several repeats of the same instructions until it was accepted (I suspect that when the ShineWiFi-X is handling data, it does not accept the instructions below and so makes it a bit hit and miss - all I can suggest is to keep trying until it works!).
The instructions required me to put the ShineWiFi-X into hotspot mode, connecting my phone to the hotspot and then using the ShinePhone app to change the update frequency. It was connecting to the hotspot through the app that was “flakey”.
To change the update frequency, I did the following:
Open the ShinePhone app
Tap on the + in the top right, then select Datalogger list
Tap on the data logger summary and select Datalogger configuration
Select Hotspot mode and then put the ShineWiFi-X in hotspot mode (hold the button on the bottom for a few seconds, the blue LED will go steady blue)
Connect to the Wi-Fi hotspot (which will be named the same as the ShineWiFi-X datalogger). The hotspot password is 12345678
Tap Next and select the Advanced options
Here the Update interval setting can be changed, I set it to 1 (minute)
Enter the standard password growattYYYYMMDD (eg growatt20231127)
Unlock
Click and apply changes and exit hotspot mode
There are various areas in the Growatt website and ShinePhone app that show the data update interval so I could see I’d successfully updated it to one minute.
Visualisation
The Growatt website and ShinePhone app have a visualisation that is typical for solar systems, here’s an example:

Of course HA has something a little better in my opinion, the Power Flow Card Plus. This is installed via HACS and, when configured appropriately, looks very elegant (see below).
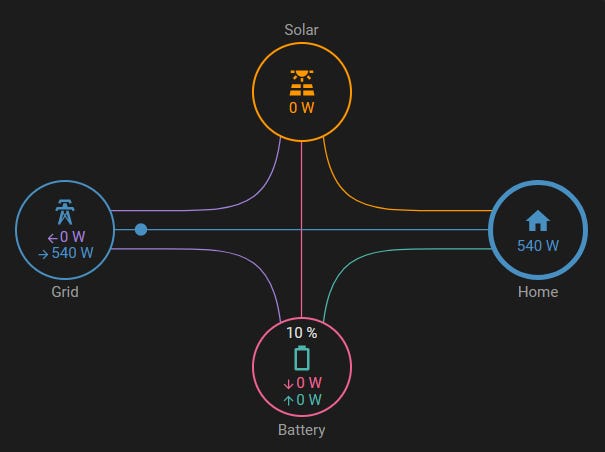
My configuration for this card is as follows:
type: custom:power-flow-card-plus
entities:
  home:
    entity: sensor.solar_panels_load_consumption_power
    color_icon: true
    color_value: true
    override_state: true
  battery:
    entity:
      consumption: sensor.solar_panels_battery_discharging_power
      production: sensor.solar_panels_battery_charging_power_2
    state_of_charge: sensor.solar_panels_state_of_charge
    color_icon: true
    color_value: true
  grid:
    entity:
      consumption: sensor.solar_panels_import_from_grid_power
      production: sensor.solar_panels_export_to_grid_power
    color_icon: true
    color_value: true
  solar:
    entity: sensor.solar_panels_pv_all_power
    icon: mdi:solar-power-variant
    color_icon: true
    color_value: true
    display_zero_state: true
  fossil_fuel_percentage: {}
clickable_entities: true
display_zero_lines:
  mode: show
  transparency: 50
  grey_color:
    - 189
    - 189
    - 189
use_new_flow_rate_model: true
w_decimals: 0
kw_decimals: 2
min_flow_rate: 0.75
max_flow_rate: 6
max_expected_power: 2000
min_expected_power: 0.01
watt_threshold: 1000
transparency_zero_lines: 0
Next steps
Now that I have all the data from my solar system in Home Assistant, updated once a minute, I can start thinking about what I can do with it. For example, if I’m exporting power, perhaps I’d be better off turning on some heating or the immersion heater. Maybe I can use the weather forecast to control how much I charge my battery overnight using cheap rate electricity.
That will be the subject of my next post on solar panels.