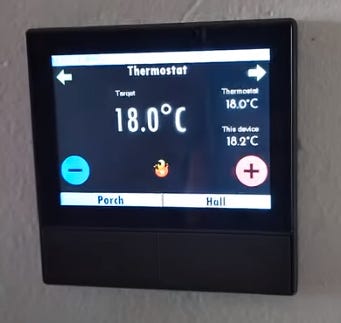
A user friendly addition to my home automation
One of the drawbacks of home automation using Home Assistant (HA) is that it can be awkward to control the devices you've taken such care to set up. Anyone who wants to switch something on and off or raise/lower a thermostat's temperature needs to use the HA app on a phone or, even less user friendly, a PC/tablet to connect to HA. My wife certainly doesn't like this so I started looking around for an alternative way of interacting with HA that she would prefer.
Options I investigated
Initially I considered using a small tablet which I would fix to the wall. However, I didn't like this as it is just another way of accessing HA directly and would require logging in to use it. It seemed a sledgehammer to crack a nut.
Then I came across the Sonoff NSPanel. This seemed just the job. A small form factor that looks like a typical wall mounted thermostat. It also has two physical switches that can be used as... yes, switches! And you can get it for under £50 if you shop around!
Initial configuration
Up until now, my home automation journey has simply consisted of buying appropriate devices and configuring software. I've not needed to deal with wires other than plugging things in. However, the NSPanel runs Sonoff's own software with its own user interface that won't easily integrate with HA (if at all - I didn't check and wasn't interested). So you have to upload a new firmware to it.
There are at least a couple of options - Tasmota or, what I chose, ESPHome. "Flashing" the software is not trivial (but it's not hard either). You need to disassemble the NSPanel, attach some wires to the circuit board and, using a USB to TTL adapter, load the ESPHome software using a PC (if you're interested, there's a very useful video here). I was a bit wary of this step but it actually went like a breeze!
After this, you can then make changes over WiFi.
Building my NSPanel
I won't go into the detail of how I built my NSPanel, it'd be too long and boring for this article but I think a few points are worth noting:
The user interface (screen) is built using a program called Nextion. This is horrible. It's painful, has some frustrating features (eg ids of features you're referencing will change if you add/remove one - this can affect, say, a screen button you're using to switch something on/off which means you have to update your yaml program accordingly) - basically it's crude!
It doesn't support transparent images! I wanted rounded buttons so I had to explicitly edit the corners of the square buttons you can have to look rounded by using my background colour. I used MS Paint for this can you believe?!
I used Material Design Icons for my buttons so there was some degree of standardisation in how the panel looks.
I've kept the number of pages low so maintenance is minimised.
The two physical buttons turn on and off the two lights that are most likely to be used and so should be easily and quickly accessible.
For some functions that I don’t want accidentally activated, for example turning on the immersion heater, I’ve required that the associated screen button must be held touched for at least 2 seconds, with a bleep confirming acceptance after those 2 seconds.
The result
The video here shows the result to date. It's simple to use, requires no logging in and I can extend it further should I need. It's there on the wall and can be used by anyone who needs to.
I know I've rushed over many of the details so if there are any questions, just message me and I'll try and answer them. I might extend this article to cover them if it makes sense.
